Problemi di funzionamento di un'API REST: cause e soluzioni
request.php) su un sito web che supporta PHP, potrebbe esserci un problema di CORS (Cross-Origin Resource Sharing), o la configurazione del server potrebbe non consentire le richieste tra domini diversi. Ecco una spiegazione più dettagliata e come risolvere il problema.Problemi Potenziali e Soluzioni
- Problema CORS (Cross-Origin Resource Sharing):
- Le richieste HTTP tra domini diversi (ad esempio, dal tuo sito web al server API locale) potrebbero essere bloccate dal browser per motivi di sicurezza.
- Assicurati che il server API (
api/index.php) consenta le richieste da altri domini aggiungendo gli header CORS appropriati.
api/index.phpper includere gli header CORS:php<?php require_once '../db.php';try { $stmt->execute(); $result = $stmt->fetchAll(PDO::FETCH_ASSOC); echo json_encode($result); } catch (PDOException $e) { echo json_encode(array("message" => "Error: " . $e->getMessage())); } } ?> - Configurazione del Server:
- Verifica che il server web sia configurato correttamente per accettare e rispondere alle richieste da altri domini.
- URL Assoluto vs Relativo:
- Assicurati di usare l’URL assoluto della tua API nella richiesta
fetch. Ad esempio:
javascriptfetch('http://tuo-api-server/api_project/api/', { method: 'POST', headers: { 'Content-Type': 'application/json' }, body: JSON.stringify(data) }) .then(response => response.json()) .then(data => displayResults(data)) .catch(error => console.error('Error:', error)); - Assicurati di usare l’URL assoluto della tua API nella richiesta
- Configurazione del Firewall/Proxy:
- Assicurati che non ci siano firewall o proxy che bloccano le richieste tra il sito web e il server API.
Aggiornamento del request.php
Ecco l’aggiornamento del file request.php per inviare una richiesta POST alla tua API e visualizzare i risultati in una tabella HTML. Assicurati di sostituire http://tuo-api-server/api_project/api/ con l’URL assoluto del tuo server API.request.php
<!DOCTYPE html>
<html lang="en">
<head>
<meta charset="UTF-8">
<title>API Request</title>
</head>
<body>
<h1>API Request</h1>
<form id="apiForm">
<label for="param1">Param1:</label>
<input type="text" id="param1" name="param1"><br><br>
<label for="param2">Param2:</label>
<input type="text" id="param2" name="param2"><br><br>
<label for="param3">Param3:</label>
<input type="text" id="param3" name="param3"><br><br>
<input type="button" value="Submit" onclick="sendRequest()">
</form>
<h2>Results:</h2>
<div id="results"></div> function displayResults(data) {
if (data.message) {
document.getElementById('results').innerHTML = '<p>' + data.message + '</p>';
} else {
var table = '<table border="1"><tr>';
// Creare l'intestazione della tabella
for (var key in data[0]) {
table += '<th>' + key + '</th>';
}
table += '</tr>';
// Popolare i dati della tabella
data.forEach(function(row) {
table += '<tr>';
for (var key in row) {
table += '<td>' + row[key] + '</td>';
}
table += '</tr>';
});
table += '</table>';
document.getElementById('results').innerHTML = table;
}
}
</script>
</body>
</html>Verifica della configurazione corretta del Server
- Aggiungere gli header CORS al tuo server API: Assicurati che il server API aggiunga gli header necessari per consentire le richieste CORS. Ecco un esempio di come farlo in PHP (
api/index.php):php<?php require_once '../db.php';header(“Access-Control-Allow-Origin: *”); header(“Access-Control-Allow-Methods: POST, GET, OPTIONS”); header(“Access-Control-Allow-Headers: Content-Type, Authorization”); header(“Content-Type: application/json; charset=UTF-8”);$db = new Database(); $conn = $db->getConnection();$requestMethod = $_SERVER[“REQUEST_METHOD”];if ($requestMethod == ‘OPTIONS’) { // Pre-flight request per CORS http_response_code(200); exit(); }if ($requestMethod == ‘POST’) { $data = json_decode(file_get_contents(“php://input”), true); if (isset($data[‘param1’]) && isset($data[‘param2’]) && isset($data[‘param3’])) { $param1 = $data[‘param1’]; $param2 = $data[‘param2’]; $param3 = $data[‘param3’]; executeFunction($conn, $param1, $param2, $param3); } else { echo json_encode(array(“message” => “Incomplete data.”)); } } else { header(“HTTP/1.0 405 Method Not Allowed”); }function executeFunction($conn, $param1, $param2, $param3) { $query = “{CALL myFunction(:param1, :param2, :param3)}”; $stmt = $conn->prepare($query);$stmt->bindParam(‘:param1’, $param1); $stmt->bindParam(‘:param2’, $param2); $stmt->bindParam(‘:param3’, $param3);try { $stmt->execute(); $result = $stmt->fetchAll(PDO::FETCH_ASSOC); echo json_encode($result); } catch (PDOException $e) { echo json_encode(array("message" => "Error: " . $e->getMessage())); } } ?> - Testare CORS con Strumenti di Sviluppo del Browser: Usa gli strumenti di sviluppo del browser (come la console di Chrome) per vedere se ci sono errori relativi a CORS. Fai clic con il tasto destro sulla pagina, seleziona “Ispeziona” e vai alla scheda “Console” o “Network”.
- Testare CORS con Curl: Usa
curldalla riga di comando per fare una richiesta e vedere la risposta del server. Ecco un esempio:Dovresti vedere una risposta simile a questa se CORS è configurato correttamente:curl -X OPTIONS http://tuo-api-server/api_project/api/ -iHTTP/1.1 200 OK Access-Control-Allow-Origin: * Access-Control-Allow-Methods: POST, GET, OPTIONS Access-Control-Allow-Headers: Content-Type, Authorization Content-Type: application/json; charset=UTF-8 - Testare con JavaScript: Crea un piccolo script HTML/JavaScript per testare la richiesta CORS:Apri questo file in un browser e clicca sul bottone “Test CORS” per vedere se la richiesta va a buon fine. Controlla la console del browser per eventuali errori relativi a CORS.
<!DOCTYPE html> <html lang="en"> <head> <meta charset="UTF-8"> <title>Test CORS</title> </head> <body> <h1>Test CORS</h1> <button onclick="testCORS()">Test CORS</button> <pre id="output"></pre><script> function testCORS() { fetch('http://tuo-api-server/api_project/api/', { method: 'POST', headers: { 'Content-Type': 'application/json' }, body: JSON.stringify({ "param1": "value1", "param2": "value2", "param3": "value3" }) }) .then(response => response.json()) .then(data => { document.getElementById('output').textContent = JSON.stringify(data, null, 2); }) .catch(error => { document.getElementById('output').textContent = 'Error: ' + error; }); } </script> </body> </html> - Controlla le Impostazioni del Server: Se stai usando Apache, Nginx, o un altro server web, assicurati che sia configurato per consentire CORS. Ecco un esempio di configurazione per Apache:Modifica il file
.htaccesso il file di configurazione del server Apache:Per Nginx, aggiungi le seguenti direttive al tuo blocco di configurazione del server:<IfModule mod_headers.c> Header set Access-Control-Allow-Origin "*" Header set Access-Control-Allow-Methods "GET, POST, OPTIONS" Header set Access-Control-Allow-Headers "Content-Type, Authorization" </IfModule>nginxlocation / { if ($request_method = 'OPTIONS') { add_header 'Access-Control-Allow-Origin' '*'; add_header 'Access-Control-Allow-Methods' 'GET, POST, OPTIONS'; add_header 'Access-Control-Allow-Headers' 'Content-Type, Authorization'; add_header 'Content-Length' 0; add_header 'Content-Type' 'text/plain'; return 204; } add_header 'Access-Control-Allow-Origin' '*'; add_header 'Access-Control-Allow-Methods' 'GET, POST, OPTIONS'; add_header 'Access-Control-Allow-Headers' 'Content-Type, Authorization'; } - Riavvia il Server: Dopo aver fatto modifiche alla configurazione del server, assicurati di riavviare il server web per applicare le modifiche.
Verifica Finale
Dopo aver configurato gli header CORS correttamente, rifai i test usando il browser e/ocurl per verificare che le richieste tra domini diversi siano ora consentite e che il server risponda correttamente. Se tutto è configurato correttamente, dovresti vedere i risultati attesi senza errori CORS.Per vedere come realizzare un’API rest vai quiHai un progetto che richiede API REST personalizzate?
I problemi tecnici che hai incontrato con le API REST — errori di autenticazione, timeout, formati di risposta non standard, gestione degli errori — sono sfide comuni nello sviluppo di integrazioni tra sistemi. La differenza tra una soluzione che funziona e una che crea problemi continui sta nella progettazione iniziale dell’architettura.
Boma Software progetta e sviluppa software personalizzato e web application aziendali che includono API REST per l’integrazione con:
- Gestionali e ERP aziendali (Navigator, TeamSystem, Zucchetti e altri)
- Piattaforme e-commerce WooCommerce — sincronizzazione prodotti, ordini e giacenze
- App mobile e sistemi di vendita su campo
- Sistemi di terze parti tramite webhook e chiamate HTTP
- Database SQL Server e MySQL con endpoint JSON strutturati
Come progettiamo le integrazioni per evitare i problemi comuni
L’esperienza su decine di integrazioni tra sistemi diversi ci ha insegnato che la maggior parte dei problemi con le API REST nasce da scelte fatte nella fase di progettazione, non nell’implementazione. Per questo il nostro approccio parte sempre dall’analisi dei flussi di dati, dei volumi e delle condizioni di errore prima di scrivere una riga di codice.
Alcuni principi che applichiamo sistematicamente:
- Autenticazione robusta: token JWT con scadenza, refresh automatico e revoca sicura — nessuna chiave in chiaro nei parametri URL
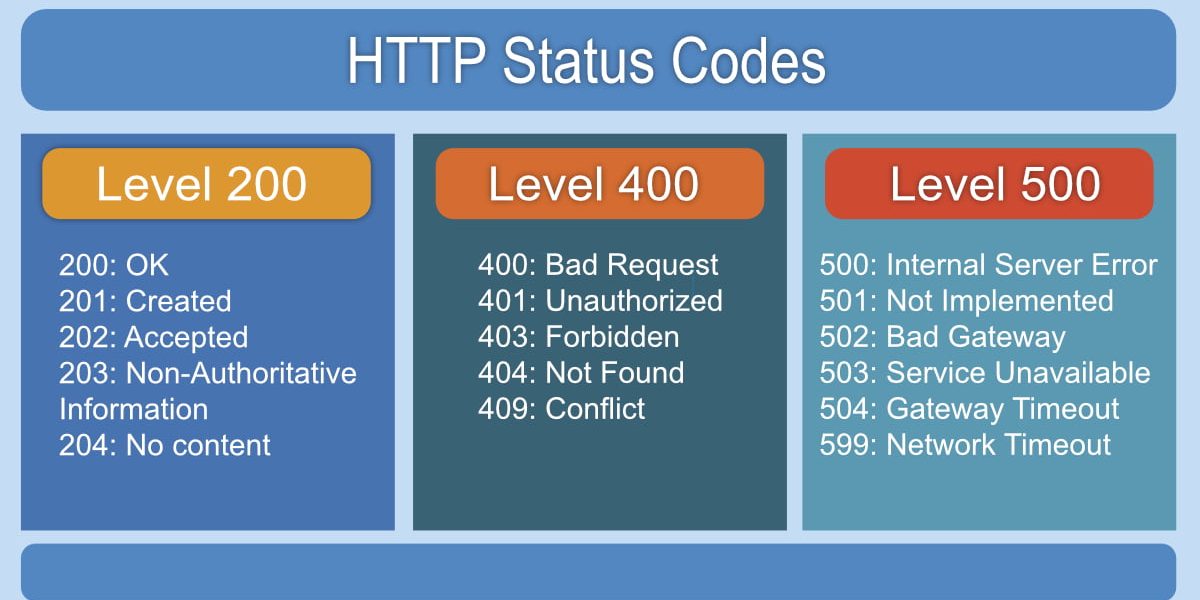
- Gestione degli errori esplicita: ogni endpoint risponde con codici HTTP corretti e messaggi di errore strutturati — nessun “200 OK” con errore nel corpo
- Documentazione degli endpoint: ogni API che sviluppiamo viene documentata con esempi di request e response, per facilitare integrazioni future
- Versionamento: le API vengono versionate (/v1/, /v2/) per permettere aggiornamenti senza rompere le integrazioni esistenti
Hai un progetto di integrazione o stai sviluppando una web app che richiede API REST affidabili? Scopri come progettiamo il software → oppure raccontaci il tuo progetto →
I nostri corsi

CORSO DI My SQL
Corso di My SQL a livello introduttivo, il gestore di basi dati open source più conosciuto al mondo

CORSO DI ORACLE
Corso di Oracle a livello introduttivo, il gestore di basi dati più potente al mondo

Corso di Microsoft SQL Server
Microsoft SQL Server, corso introduttivo. Come costruire un database, gestire l’inserimento modifica e cancellazione. Come interrogare i dati e come interagire coi dati nella rete.

Corso di SQL (Structured Query Language)
Teoria e tecnica sulla progettazione database relazionali. Come progettare e realizzare un database attraverso un RDBMS come Microsoft Access, SQL Server, My SQL o Oracle.

CORSO DI PROGETTAZIONE DATABASE
Teoria e tecnica sulla progettazione database relazionali. Come progettare e realizzare un database attraverso un RDBMS come Microsoft Access, SQL Server, My SQL o Oracle.

CORSO MICROSOFT ACCESS AVANZATO
Corso Microsoft Access Avanzato. Approfondimento delle funzionalità del software di gestione database di Microsoft.